I forgot the flour in my recipe!!!!!
2 1/3 cups
I am so sorry!!!!!
Thursday, December 1, 2011
Tuesday, November 22, 2011
Feeling Snappy!
Look out!....the flour is flying!
I am in the midst of Thanksgiving baking.
As we speak, the timer is beeping in the kitchen.
Another pan of Ginger Snaps is finished.

Ginger snaps are one of my favorite cookies,
and I am very picky about their taste.
To me, a great ginger snap should have many layers of flavor.
And these little cookies deliver.
I took a basic recipe and worked with it until it had just the right amount of "snap."
Take a bite....
first your salivary glands will start to moisten your mouth from the buttery, slightly salty taste.
Chew a little and you become aware of the sweetness and spiciness.
Then....WHAM!..
the snap hits you and you get a peppery-ginger sensation on the back of your tongue.
Perfect wind-up and perfect follow through.....in baseball terms.
In honor of this sensational experience,
I am sharing my recipe with you.....
Enjoy!!!
Snappy Ginger Snaps
3/4 cup butter
1 cup sugar
1 egg
1/2 tsp salt
2 tsp baking soda
1/3 cup molasses
2 tsp. ginger
1/2 tsp. cloves (I use a heaping 1/2 tsp.)
1 tsp. cinnamon (heaping, again)
2 tsp. finely chopped crystallized ginger
1 tsp. ground red cayenne pepper
Cream butter and sugar. Add egg and beat til smooth. Add salt, molasses and spices and beat til well mixed. Add flour and beat until well mixed.
Roll tsp. sized dough into balls. (cookies will flatten) You can roll balls in sugar if you choose, but I don't bother. Bake at 375 for 14 minutes
Let me know if you don't think these are just the snappiest EVAH!!!
Happy Thanksgiving!
Monday, November 14, 2011
I'm Back!
Oh my gosh....
it has been forever since I have had a chance to post on this blog.
Farming (and especially the addition of 2 piglets)
has kept me exceptionally busy.
On rainy days, though, I do take the opportunity to catch up with a little sewing.
Here is what I have been up to these past few weeks.
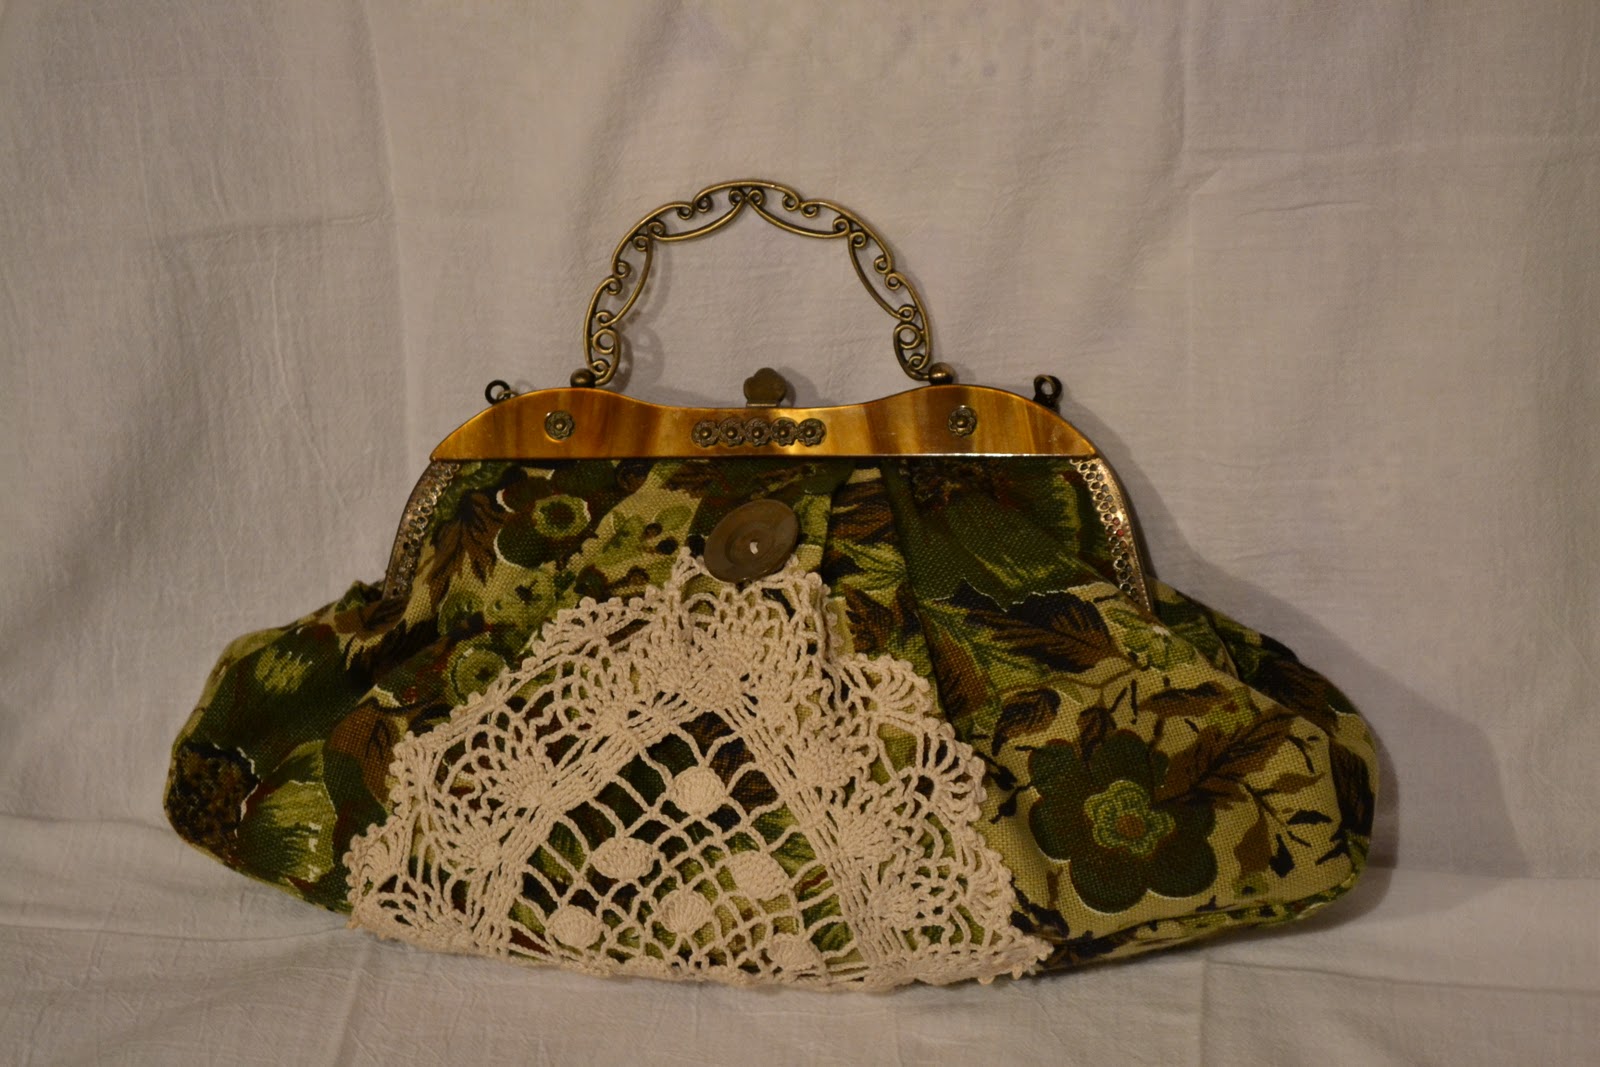
A blog friend contacted me to see if I could make a particular type of purse for her.
It was called a Grace Kelly purse and was constructed on a purse frame.
Unable to locate the particular frame for her,
I thought I would at least try my hand at this type of purse.
So, I de-constructed an old bag that I never carry and used the frame from that bag
and some fabric that we bought this past October at a fabric rummage sale,
and constructed this new bag.

It is lined....

and trimmed with an antique doily and button...


Another version of the same apron...


I have so many other projects on the cutting table,
and oodles more to follow them.
If only I had a few elves to help me complete them!!
and constructed this new bag.
It is lined....

and trimmed with an antique doily and button...

Over the past few weeks,
I have also had a chance to make a few more aprons.
These are made over my 1940's style pattern.
This time I shortened the length to make it more contemporary.

I made the bias binding in a coordinating fabric.
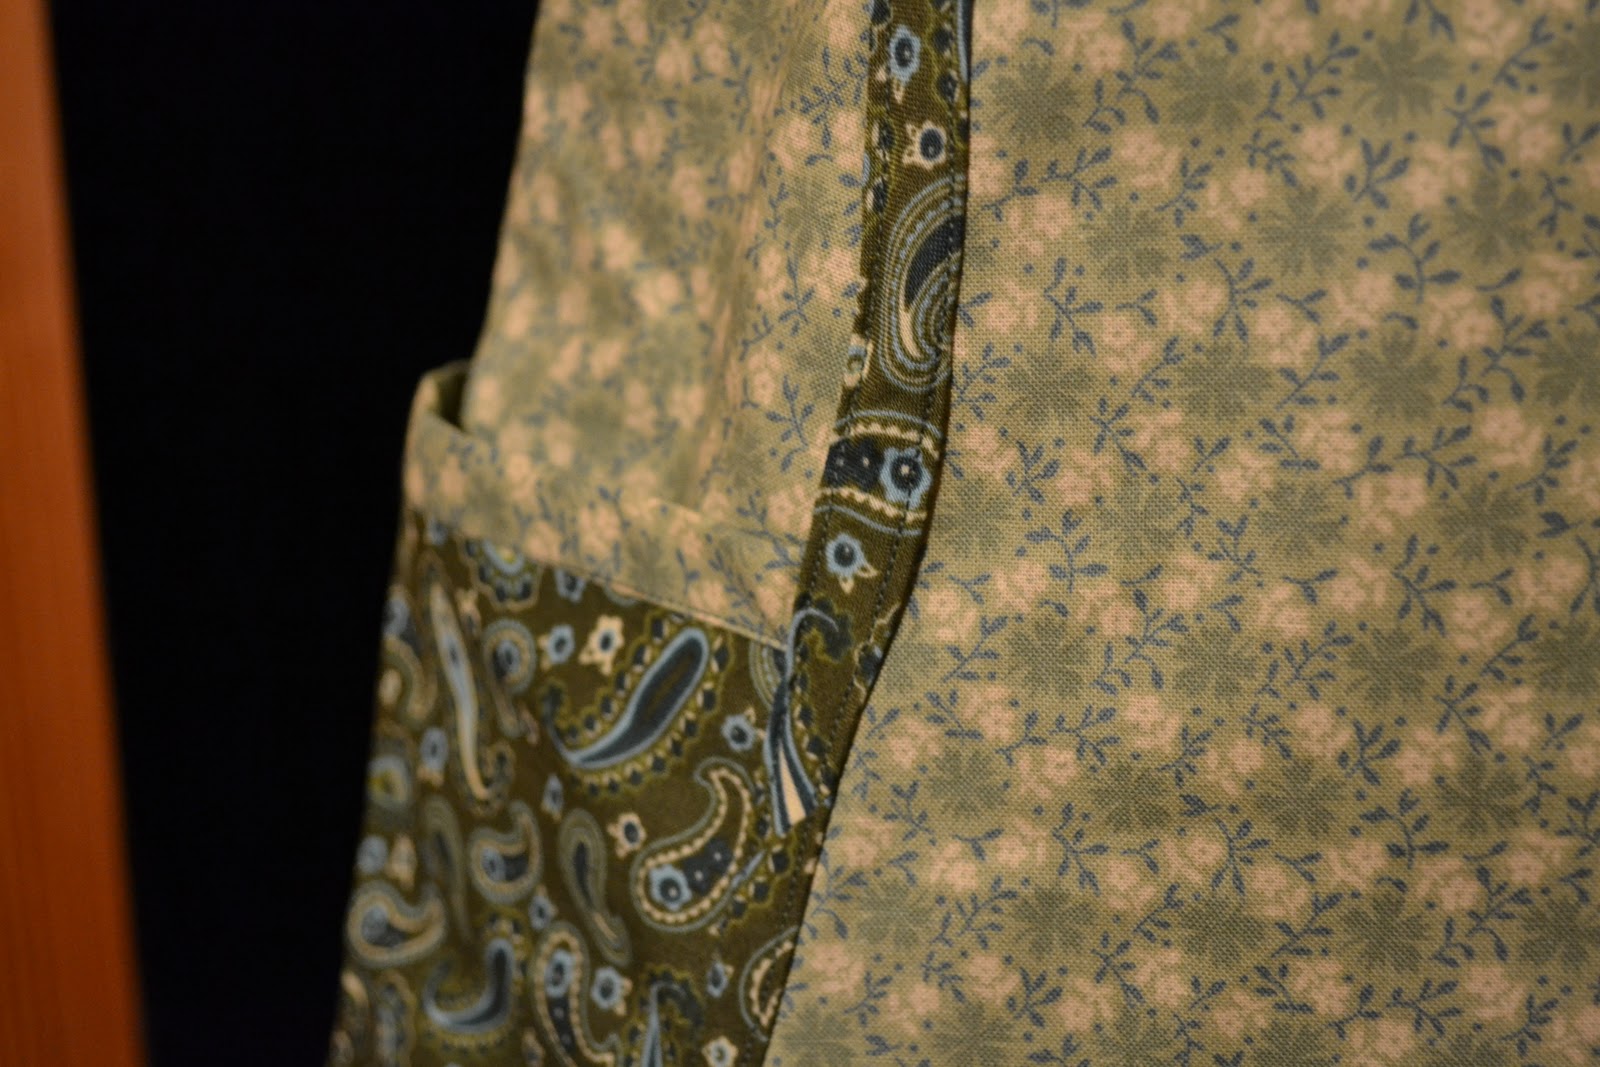
I love the detail of the back of this apron.
It fits all sizes as it is quite generous in width,
with very long ties.
The ties actually slide through slits in the back panel and then tie in front.

Another version of the same apron...

Made from the same fabric,
but different coordinating fabric.

Another bag that I made in the messenger style...

from an old feed sack...
lined in quilted fabric

and trimmed with antique buttons.

I have so many other projects on the cutting table,
and oodles more to follow them.
If only I had a few elves to help me complete them!!
Tuesday, October 4, 2011
Sewing Projects
Last year I made the green linen pinafore pictured on the sidebar of this blog.
I got a lot of positive comments about this pinny,
so I thought I would tweak the pattern a bit and make one out of cotton.

Cotton is so much more versatile for an every day pinny.
This one is a lovely dark coral and pink print.

It is cut very roomy and is modeled by my full figured dress form,
however, tied tighter it also fits me well.
Long ties at the shoulder blades allow for ample figures.
Long ties at the shoulder blades allow for ample figures.

I am offering this one up for sale. ($40.00)
If you are interested, please email me.
Also for sale is this 1940's style apron sewn with vintage fabric.

This one has a back panel that slips over the head,
through which two ties from the waist slip with generous length for larger sizes.
It has a matching potholder in the pocket.

$30.00
All of my aprons have French seams.
They are sewn over my own patterns.
I pride myself in quality craftsmanship.
So, if either you desire....let me know.
Monday, September 26, 2011
Autumn Decorating
Have I ever told you that I love Autumn best of all?
I do.
I love the changing leaves,
the cooler nights,
sweaters,
bonfires,
pumpkins,
and Halloween.
It is a magical time of year and I love to make the inside of our house
reflect that magic.
I have started to decorate for Autumn.
Here are a few shots I thought I would share with you....
Cooler weather has brought the mice indoors,
looking for warmth and food...


Filled with potions...


This is just the start of the decorating.
All manner of pumpkin are yet to come....
reflect that magic.
I have started to decorate for Autumn.
Here are a few shots I thought I would share with you....
Cooler weather has brought the mice indoors,
looking for warmth and food...

My witch's hat...ready to wear,
if only I could find my broom!
(Don't worry, I am not a real witch....
just a gal who loves to find magic in the world around her!)
I have created my very own Witch's Apothecary shop...
wickedly fun!

Filled with potions...


and magic of all sorts.
Star dust...for making dreams come true!
A book of spells might come in handy,
especially for getting rid of those mice!

A bottle of Fairy Tears...
did you know that fairy tears are purple?

This is just the start of the decorating.
All manner of pumpkin are yet to come....
Monday, August 29, 2011
Hydrangea Pinny
This weekend's rainy weather gave me a chance to sew for a bit.
I am hooked on this 1940's style pattern.
And who can resist such feminine fabric?

This apron fits most sizes,

and is up for grabs.
 |
| Hydrangea Pinny |
Email me if you would like to purchase it.
sold
Wednesday, August 10, 2011
1940's Pinnies
My favorite apron for farm chores is this 1940's pinny
that I received as a gift.
I love this apron...
it is lightweight and yet provides a maximum of coverage.

The past week has given me a few days of rain and so I set to the task
of recreating this pinny.
My first version of it went my friend Maura.
You can see it HERE on her blog.
Here are a few more versions...
This one I made just for me.
The fabric is bees on chicken wire, of course!


The fabric is bees on chicken wire, of course!

I love the detail of the back...this makes it quite comfortable to wear
all day long.

The next two will be for sale on my apron site
as soon as I get the time to post them.
(or if you would like one....just email me!)


And hens, of course....perfect for gathering eggs!

These aprons are cut very full with extra long ties
and would fit a medium to large frame.
They might be a little big on a tiny woman, though.
the back details are identical to the apron I made for myself.
Oh goodness, I had forgotten how much I enjoy sewing!
Thursday, June 23, 2011
Oh my goodness, how long has it been since I have sewn something?
(Seems like months!)
Somehow in the past two days I snuck in a little sewing time...
probably because the garden is planted,
it has rained each day (no watering needed to be done),
the house is clean and the laundry is done.
Every day while I am out doing tasks around the farm,
I envision what type of apron would be the perfect "can-do"
apron for farmgirls of all types.

Inspired by my beloved chickens,
(I love the cheerful chicken and sunny side up egg fabrics.)
I came up with this everyday-chore-apron,
with ample and deep pockets....
perfect for bringing in the day's garden fare,
or for collecting eggs,
or even for holding lots of clothespins while hanging the laundry.
There's even a small pocket sewn in to the side for a cell phone.
I can think of tons of uses each and every day!
This one is for sale HERE,
but I think I'll have to make another just for me!
Friday, June 3, 2011
Garden Projects
This adorable wreath adorns the front of my garden shed.
Although this particular wreath was a gift to me,
I think it would be amazingly easy to construct.

An old garden hose, some silk flowers and a bow....
and voila....
adorable!
Secondly, I have seen this next project in magazines lately,
and on other blogs.
It's a simple, inexpensive project.

Simply.....hammer an old silver plated spoon until it is flat.
(a mallet works best)

Stamp the letters with metal stamps
and use permanent ink to stain the letters.

I was working on an old tree stump...

Until Edith came over and started to steal my spoons.

These are now in my herb garden.....

If you are interested in making these, you will need a set of metal letter stamps
which you can find on Ebay for $10 a set.
Spoons are easy to come by and cheap at your local thrift store / flea market.
Sunday, April 17, 2011
Chocolate For a Rainy Day!
I am not sure how much more rain I can take.
Or should I say, how much more rain my waistline can take!
Saturday's weather was as much like a monsoon as I have ever experienced,
so I spent the day baking,
and baking,
and baking.
I started with bread....

Next, moved to cookies...

Followed that with a double batch of black and white biscotti...

The grand finale was this chocolate fudge cake...

I am sure it is the best I have ever made...maybe even the best I have ever eaten.
It is so, so yummy, that I thought I would share the recipe, in case you wanted to try it too!
Wellesley Fudge Cake
4 oz unsweetened chocolate
1/2 cup water
1 3/4 cup sugar
1 2/3 cups flour
1 teaspoon baking soda
1 teaspoon salt
1/2 cup butter
3 eggs
3/4 cup milk
1 teaspoon vanilla
Melt chocolate in water in saucepan over very low heat, stirring constantly until smooth. Add 1/2 cup of the sugar; cook and stir 2 minutes longer. Cool. Mix flour, soda and salt. Cream butter. Gradually beat in remaining 1 1/4 cups sugar and continue beating until light and fluffy. Add eggs, one at a time, beating thoroughly after each. Alternately add flour mixture and milk, beating after each addition until smooth. Blend in vanilla and chocolate mixture.
Pour into 2 greased and floured 9 inch layer pans. Bake at 350 for 30 to 35 minutes. Cool in pans 10 minutes. Remove from pans and finish cooling on rack. Spread frosting between layers and over top and sides. Garnish with chipped nuts, if desired.
Classic Fudge Frosting
4 oz. unsweetened chocolate
2 tablespoons butter
4 cups confectioners sugar
dash of salt
1/2 cup milk
1 teaspoon vanilla
Melt chocolate with butter over very low heat, stirring constantly until smooth. Remove from heat. Combine sugar, salt, milk and vanilla. Add chocolate, blending well. If necessary, let stand until of spreading consistency, stirring occasionally. Spread quickly, adding a small amount of additional milk if frosting thickens.
Note, I used a couple bars of this for my unsweetened chocolate...

Yummy, rich, dark chocolaty decadence!
Here's hoping the sun soon shines,
or I will weigh a ton!
Friday, April 15, 2011
Natural Egg Dye Recipes
For those of you who would rather use all natural dyes than chemical dyes for your easter eggs, I found the following recipes from Sonnewald Natural Foods.

Natural Egg Dyes Recipes
Use hard cooked brown or white eggs. After eggs are cooked, quickly cool the water or rinse in cold water. This helps to prevent greening of the yolk. Natural dyes take longer to color the egg, so plan on extra time, or leave the eggs in the refrigerator overnight.
Recipes make approximately 1 cup dye.
Yellow or deep gold:
1 – 2 tsp. turmeric powder, fill cup with boiling water, stir in 1 tsp. white vinegar (dusty after drying, wipe gently with dry cloth & be very careful for stains) Orange or lemon peels, carrot tops, celery seed, & ground cumin can be added for variation.
Peach to orange:
1 large handful yellow onion skins simmered 20 minutes. Now add 1 tsp. white vinegar.
Rust:
1 large handful of a mix of yellow & red onion skins, prepared as above.
Red:
2 – 4 tbsp. freshly grated beets, fill cup with boiling water, stir in 1 tsp. white vinegar Allow to sit overnight. Cranberries or frozen raspberries can also be used.
Purple:
2 tbsp. grated beets, 2 tbsp. red cabbage, fill cup with boiling water, stir in 1 tsp. vinegar A bluer shade of purple can be made using grape juice concentrate and 1 tsp. white vinegar
Blue:
Bright 2 – 3 tbsp. chopped red cabbage, fill cup with boiling water, stir in 1 tsp. white vinegar Allow to set overnight. Blueberries may also be used.
Green:
3⁄4 - 1 tsp. turmeric, 2 – 3 tbsp. chopped red cabbage, fill cup with boiling water, stir in 1 tsp. vinegar. Spinach leaves, carrot tops, and yellow delicious apple peels can also be used.
Beige to brown:
Strongly brewed coffee, limes, pecan, or walnut shells can be used.
Another method - Place eggs in a single layer in a pan. Cover with water. Add 1 tsp. vinegar and dye materials of choice. (Brighter, deeper colors require more dye material.) Bring to a boil, reduce heat and simmer for 15 minutes. Cool quickly. (sit bowl in ice water) Allow to set, covered in the refrigerator overnight if more color is desired. Drain and dry.
From www.sonnewald.org
Sunday, April 10, 2011
Baking Ideas
My favorite coconut cake recipe...
made into sweet Easter cupcakes,


topped with cream cheese/butter frosting
grass green coconut,


easter eggs,
with a vintage bunny topper.

You can find the recipe HERE.
And here is the graphic if you want to make a topper.

I printed them and flipped the image to make matching back sides.
(Ooohhh, I can hardly wait for dessert!!)
Now off to pop a loaf of whole grain bread into the oven,
and baking for the week is finished.
(Ooohhh, I can hardly wait for dessert!!)
Now off to pop a loaf of whole grain bread into the oven,
and baking for the week is finished.
Subscribe to:
Posts (Atom)